Mehndi is a form of body art that originated in ancient India and is still popular today, especially in South Asia, the Middle East, and North Africa. A simple Mehndi design is created by applying a paste made from the dried leaves of the henna plant to the skin. The paste is left to dry for several hours or overnight, and then it is removed to reveal a temporary tattoo.
There are many different styles of mehndi design, ranging from simple, geometric patterns to elaborate, intricate designs that cover large areas of the body. Some common elements of mehndi design include flowers, vines, and geometric shapes. The designs are often symmetrical and may be inspired by nature or cultural symbols.
Mehndi is typically applied to the hands, arms, and feet, but it can be applied to any part of the body. It is often used for special occasions such as weddings, festivals, and religious ceremonies, and it is also a popular form of self-expression and body art.
Here are a few simple mehndi designs that you can try for the back of your hand:
A single, thin line runs down the center of your hand. This can be a simple and elegant design that is easy to apply.
A series of thin, parallel lines run down the center of your hand. This can create a more intricate and detailed look.
A series of small, dot-like designs arranged in a line or pattern. This can be a playful and creative way to incorporate mehndi into your look.
A series of simple, geometric shapes arranged in a pattern. This can be a modern and contemporary take on traditional mehndi design.
Remember to start with a small, simple design and gradually add more complexity as you become more comfortable with applying mehndi. It’s also important to make sure that the mehndi paste is applied smoothly and evenly for the best results. Floral and Net Simple Mehndi Design
Start by drawing a large flower on the back of your hand. You can use a circular or petal-shaped design for the flower.
Add smaller flowers around the larger ones, filling in the empty spaces. You can use different shapes and sizes for the smaller flowers.
Draw thin, curved lines radiating out from the center of the large flower to create a net-like pattern.
Fill in the spaces between the lines with small dots or teardrop shapes.
Repeat the process, on the other hand, making sure to create a balanced design.
You can add additional details, such as leaves or vines, to complete the design.
Keep in mind that mehndi designs are highly customizable, so feel free to get creative and add your own personal touch to the design.
Start by drawing a small circle near the base of your thumb. This will be the center of the first flower.
From the circle, draw four curved lines outward to create the petals of the flower.
Fill in the petals with a solid line.
Repeat the process to create additional flowers along the back of the hand. You can vary the size and shape of the flowers to add variety to the design.
Add small, simple leaves between the flowers to fill in any empty spaces and complete the design.
Mehndi is a form of body art that originated in ancient India, in which intricate designs are created on the skin using a paste made from the powdered leaves of the henna plant. Floral and bead patterns are popular choices for mehndi designs, as they can add a beautiful, decorative touch to the skin.
To create a simple mehndi design featuring floral and bead patterns, you can start by drawing a series of small, interconnected flowers using thin, curved lines. You can then add small, circular beads in between the flowers to give the design more visual interest. For a more complex design, you can add additional elements such as leaves, tendrils, and swirling lines to create a more intricate and detailed look.
Keep in mind that mehndi designs are traditionally applied to the hands and feet, but you can also create them on other parts of the body if you desire. To apply the design, you will need a small, cone-shaped tube filled with the henna paste, which you can squeeze out in thin lines to create the desired patterns. It’s a good idea to practice your design on paper before applying it to your skin, so you can get a feel for the technique and fine-tune your design as needed.
To create a modern Aztec-style mehndi design, you could start by incorporating Aztec symbols and motifs, such as pyramids, suns, and eagles, into the design. You could also use bold, geometric lines and shapes, and incorporate bright, vibrant colors.
Here are some ideas for creating a simple, modern Aztec-style mehndi design:
Start with a small pyramid or sun symbol at the center of the design, and then add geometric lines and shapes radiating out from the center.
Use bold, solid lines to create an outline of an eagle or other Aztec symbol, and then fill in the design with smaller geometric shapes and patterns.
Mix and match different Aztec symbols and motifs to create a unique and personalized design.
Incorporate bright, vibrant colors, such as red, orange, and yellow, to add a modern twist to the traditional mehndi design.
Remember to start with a simple design and build upon it as you become more comfortable with the mehndi application process. With practice and creativity, you can create beautiful, modern Aztec-style mehndi designs.
Mesh finger mehndi designs are a popular choice for henna tattoos because they offer a delicate and intricate look. The design is created by drawing a series of interconnected lines and shapes on the finger, creating a net-like or mesh-like pattern.
To create a mesh finger mehndi design, you will need the following materials:
Henna paste or cone
Toothpick or fine-tipped applicator tool
Lemon juice or sugar syrup (optional)
Plastic wrap or medical tape (optional)
Here is a step-by-step guide for creating a mesh finger mehndi design:
Begin by drawing a series of thin lines on your finger, starting at the base of the nail and working your way up the finger. The lines should be close together and slightly curved to create a net-like pattern.
Fill in the spaces between the lines with small dots or teardrop shapes.
Continue adding lines and filling in the spaces until you have covered the entire finger.
If desired, you can add additional details and designs to the mehndi design by drawing additional lines and shapes.
Once you have completed the design, you can apply lemon juice or sugar syrup to the henna to help set the design and darken the color.
Wrap the finger in plastic wrap or medical tape to keep the paste in place and allow it to be set for several hours or overnight.
When you are ready to remove the henna paste, gently scrape it off with a fingernail or the edge of a credit card. The design should last for several weeks before fading.
Remember to practice proper hygiene when applying henna tattoos, and always do a patch test on a small area of skin before applying the paste to a larger area.
Here is a simple mehndi design with a mandala on the hand:
Begin by drawing a large circle in the center of your hand, using a thin mehndi cone or brush. This will be the base of the mandala.
From the center of the circle, draw four equally spaced lines radiating outward to form a cross.
Next, draw four smaller circles in each of the quadrants formed by the cross.
Connect the small circles with curved lines, forming a petal-like shape.
Fill in the spaces between the petals with intricate, swirling designs. You can use a range of patterns and shapes, such as paisleys, dots, and curves.
Continue adding details and patterns to the mandala, using the center circle and the outer petals as a guide. You can also add small mandalas or other designs within the larger mandala.
When you’re happy with the design, let the mehndi dry completely before removing the excess paste with a cotton ball or tissue.
Remember to keep the mehndi cone or brush steady as you work, and take your time to create a detailed and symmetrical design. You can also use stencils or print out a reference image to help guide your design.
Here is a simple mehndi design with swirls and spirals that you can try:
Start by drawing a spiral at the center of your palm.
From the center spiral, draw smaller spirals around it.
Connect the spirals with curved lines to create a cohesive design.
Add in some swirling details between the spirals to add interest and depth to the design.
You can also add in some dots or other small details to further customize the design.
Remember to leave some negative space in the design to balance out the busy elements. You can also try incorporating some traditional mehndi motifs, such as flowers or paisleys, into the design.
Mehndi, also known as henna, is a form of body art that originated in South Asia and is now popular around the world. It involves the application of a paste made from the dried, crushed leaves of the henna plant to the skin, where it creates a temporary tattoo.
There are many different mehndi designs, ranging from simple and understated to elaborate and ornate. Some common themes in mehndi designs include flowers, leaves, and geometric patterns. Many people choose to have mehndi designs on their hands and feet, although they can also be applied to other parts of the body.
Mehndi is often used for special occasions such as weddings and festivals and is often applied by a professional mehndi artist or self-taught enthusiast. The paste is applied using a cone or applicator bottle and allowed to dry, after which it can be removed to reveal the tattoo-like design.
If you’re interested in trying mehndi, there are many resources available online and in books that can help you learn about different designs and techniques. You can also seek out a professional mehndi artist in your area to have a design applied, or attend a mehndi workshop to learn more about the art form.
There are many different styles of mehndi design, ranging from simple, geometric patterns to elaborate, intricate designs that cover large areas of the body. Some common elements of mehndi design include flowers, vines, and geometric shapes. The designs are often symmetrical and may be inspired by nature or cultural symbols.
Mehndi is typically applied to the hands, arms, and feet, but it can be applied to any part of the body. It is often used for special occasions such as weddings, festivals, and religious ceremonies, and it is also a popular form of self-expression and body art.
Simple Mehndi Design for Backhand
Here are a few simple mehndi designs that you can try for the back of your hand:
A single, thin line runs down the center of your hand. This can be a simple and elegant design that is easy to apply.
A series of thin, parallel lines run down the center of your hand. This can create a more intricate and detailed look.
A series of small, dot-like designs arranged in a line or pattern. This can be a playful and creative way to incorporate mehndi into your look.
A series of simple, geometric shapes arranged in a pattern. This can be a modern and contemporary take on traditional mehndi design.
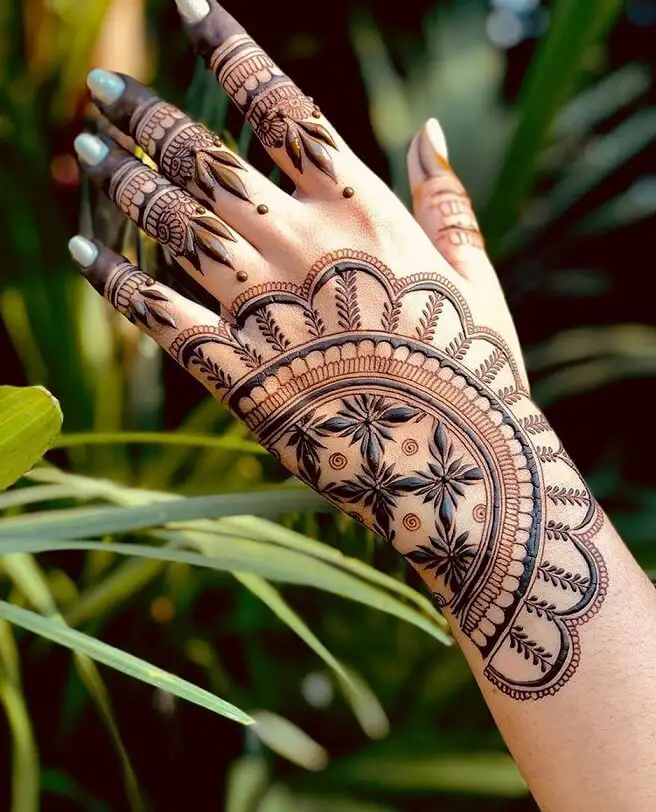
Remember to start with a small, simple design and gradually add more complexity as you become more comfortable with applying mehndi. It’s also important to make sure that the mehndi paste is applied smoothly and evenly for the best results. Floral and Net Simple Mehndi Design
Start by drawing a large flower on the back of your hand. You can use a circular or petal-shaped design for the flower.
Add smaller flowers around the larger ones, filling in the empty spaces. You can use different shapes and sizes for the smaller flowers.
Draw thin, curved lines radiating out from the center of the large flower to create a net-like pattern.
Fill in the spaces between the lines with small dots or teardrop shapes.
Repeat the process, on the other hand, making sure to create a balanced design.
You can add additional details, such as leaves or vines, to complete the design.
Keep in mind that mehndi designs are highly customizable, so feel free to get creative and add your own personal touch to the design.
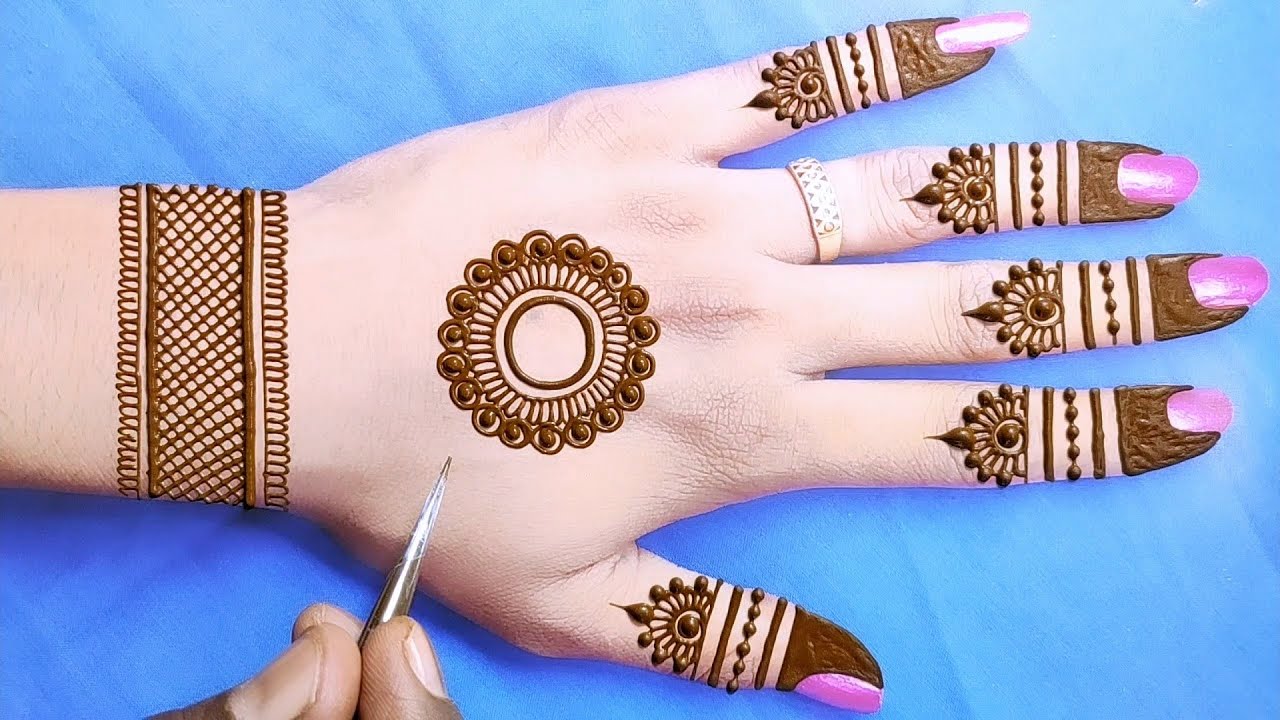
Backhand Simple Mehndi Design with Flowers
Start by drawing a small circle near the base of your thumb. This will be the center of the first flower.
From the circle, draw four curved lines outward to create the petals of the flower.
Fill in the petals with a solid line.
Repeat the process to create additional flowers along the back of the hand. You can vary the size and shape of the flowers to add variety to the design.
Add small, simple leaves between the flowers to fill in any empty spaces and complete the design.
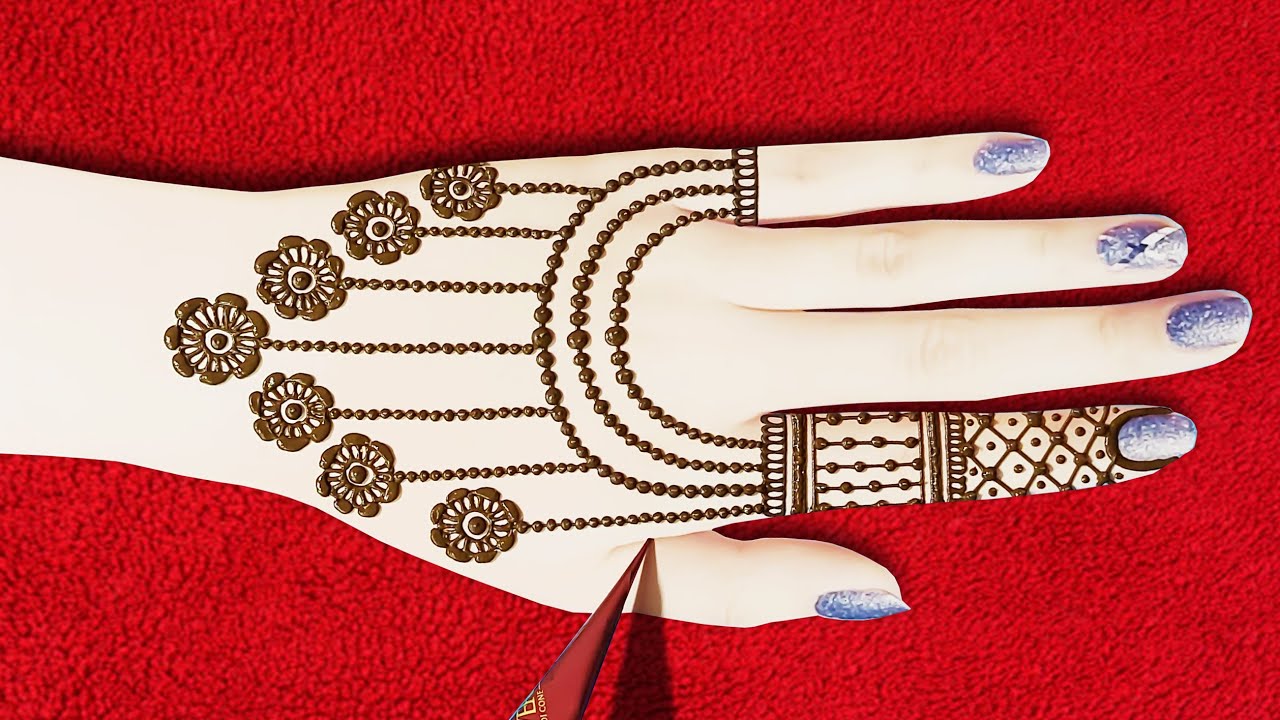
Floral and Bead Pattern Simple Mehndi Design
Mehndi is a form of body art that originated in ancient India, in which intricate designs are created on the skin using a paste made from the powdered leaves of the henna plant. Floral and bead patterns are popular choices for mehndi designs, as they can add a beautiful, decorative touch to the skin.
To create a simple mehndi design featuring floral and bead patterns, you can start by drawing a series of small, interconnected flowers using thin, curved lines. You can then add small, circular beads in between the flowers to give the design more visual interest. For a more complex design, you can add additional elements such as leaves, tendrils, and swirling lines to create a more intricate and detailed look.
Keep in mind that mehndi designs are traditionally applied to the hands and feet, but you can also create them on other parts of the body if you desire. To apply the design, you will need a small, cone-shaped tube filled with the henna paste, which you can squeeze out in thin lines to create the desired patterns. It’s a good idea to practice your design on paper before applying it to your skin, so you can get a feel for the technique and fine-tune your design as needed.
Modern Aztec Style Simple Mehndi Design
To create a modern Aztec-style mehndi design, you could start by incorporating Aztec symbols and motifs, such as pyramids, suns, and eagles, into the design. You could also use bold, geometric lines and shapes, and incorporate bright, vibrant colors.
Here are some ideas for creating a simple, modern Aztec-style mehndi design:
Start with a small pyramid or sun symbol at the center of the design, and then add geometric lines and shapes radiating out from the center.
Use bold, solid lines to create an outline of an eagle or other Aztec symbol, and then fill in the design with smaller geometric shapes and patterns.
Mix and match different Aztec symbols and motifs to create a unique and personalized design.
Incorporate bright, vibrant colors, such as red, orange, and yellow, to add a modern twist to the traditional mehndi design.
Remember to start with a simple design and build upon it as you become more comfortable with the mehndi application process. With practice and creativity, you can create beautiful, modern Aztec-style mehndi designs.
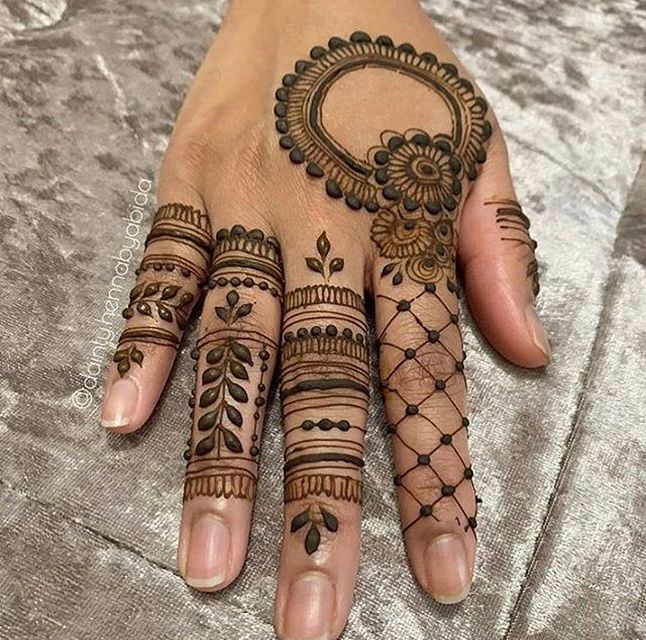
Mesh Finger Mehndi Design
Mesh finger mehndi designs are a popular choice for henna tattoos because they offer a delicate and intricate look. The design is created by drawing a series of interconnected lines and shapes on the finger, creating a net-like or mesh-like pattern.
To create a mesh finger mehndi design, you will need the following materials:
Henna paste or cone
Toothpick or fine-tipped applicator tool
Lemon juice or sugar syrup (optional)
Plastic wrap or medical tape (optional)
Here is a step-by-step guide for creating a mesh finger mehndi design:
Begin by drawing a series of thin lines on your finger, starting at the base of the nail and working your way up the finger. The lines should be close together and slightly curved to create a net-like pattern.
Fill in the spaces between the lines with small dots or teardrop shapes.
Continue adding lines and filling in the spaces until you have covered the entire finger.
If desired, you can add additional details and designs to the mehndi design by drawing additional lines and shapes.
Once you have completed the design, you can apply lemon juice or sugar syrup to the henna to help set the design and darken the color.
Wrap the finger in plastic wrap or medical tape to keep the paste in place and allow it to be set for several hours or overnight.
When you are ready to remove the henna paste, gently scrape it off with a fingernail or the edge of a credit card. The design should last for several weeks before fading.
Remember to practice proper hygiene when applying henna tattoos, and always do a patch test on a small area of skin before applying the paste to a larger area.
Simple Mehndi Design with Mandala on the Hand
Here is a simple mehndi design with a mandala on the hand:
Begin by drawing a large circle in the center of your hand, using a thin mehndi cone or brush. This will be the base of the mandala.
From the center of the circle, draw four equally spaced lines radiating outward to form a cross.
Next, draw four smaller circles in each of the quadrants formed by the cross.
Connect the small circles with curved lines, forming a petal-like shape.
Fill in the spaces between the petals with intricate, swirling designs. You can use a range of patterns and shapes, such as paisleys, dots, and curves.
Continue adding details and patterns to the mandala, using the center circle and the outer petals as a guide. You can also add small mandalas or other designs within the larger mandala.
When you’re happy with the design, let the mehndi dry completely before removing the excess paste with a cotton ball or tissue.
Remember to keep the mehndi cone or brush steady as you work, and take your time to create a detailed and symmetrical design. You can also use stencils or print out a reference image to help guide your design.
Simple Mehndi Design with Swirls and Spirals
Here is a simple mehndi design with swirls and spirals that you can try:
Start by drawing a spiral at the center of your palm.
From the center spiral, draw smaller spirals around it.
Connect the spirals with curved lines to create a cohesive design.
Add in some swirling details between the spirals to add interest and depth to the design.
You can also add in some dots or other small details to further customize the design.
Remember to leave some negative space in the design to balance out the busy elements. You can also try incorporating some traditional mehndi motifs, such as flowers or paisleys, into the design.
Final Words
Mehndi, also known as henna, is a form of body art that originated in South Asia and is now popular around the world. It involves the application of a paste made from the dried, crushed leaves of the henna plant to the skin, where it creates a temporary tattoo.
There are many different mehndi designs, ranging from simple and understated to elaborate and ornate. Some common themes in mehndi designs include flowers, leaves, and geometric patterns. Many people choose to have mehndi designs on their hands and feet, although they can also be applied to other parts of the body.
Mehndi is often used for special occasions such as weddings and festivals and is often applied by a professional mehndi artist or self-taught enthusiast. The paste is applied using a cone or applicator bottle and allowed to dry, after which it can be removed to reveal the tattoo-like design.
If you’re interested in trying mehndi, there are many resources available online and in books that can help you learn about different designs and techniques. You can also seek out a professional mehndi artist in your area to have a design applied, or attend a mehndi workshop to learn more about the art form.